Kody in diamonds, the follow up

Yesterday I showed you the ‘Kody in diamonds‘ hat, made out of yarn I spun from the fur of my dog, Kody. This hat was a present for my brother, Callan. Today, I present, the brother, and the hat, and the dog! plus another dog… in the hat!!!

Crochet cable hat with dog fur yarn_20140519_114804

What a handsome boy :)

Crochet cable hat with dog fur yarn_20140519_114823

Wearing a shirt just isn’t his thing.

Crochet cable hat with dog fur yarn_20140519_115037

Trying to photograph a camera shy dog. The trick is to keep the camera by your leg and hope the dog is in frame.

Crochet cable hat with dog fur yarn_20140519_115050

Plus lots of distracting attention.

Crochet cable hat with dog fur yarn_20140519_115046

I think he’s onto us.

Camera shy dog_20140519_115104

And… he’s off.

Dog in dog fur hat_20140519_115256

This one isn’t camera shy!

Dog in dog fur hat_20140519_115335

This is a our girl, Delle, she’s a sweetie. Her fur would be no good for spinning, so instead she shall be our model.

Dog in dog fur hat_20140519_115347

You guys suck.

Kody in diamonds

A couple of weeks ago I started spinning yarn out of the fur of my dog, Kody. This was a specific request from my brother, who wanted me to make him a hat out of the yarn. Today, I present, the hat!

Crochet cable hat with dog fur yarn_20140518_161110

I’m really really happy with how this yarn worked out. I wasn’t sure about how it would look in a finished product, particularly with the cables. I needn’t have feared, it came together beautifully. This yarn ended up being around worsted-weight (10-ply), probably slightly lighter. But heavy enough to work with the a worsted-weight pattern, using a 6 mm hook to make the hat large sized. The colour is the natural gold of Kody’s undercoat, which is also provides the fuzz :) I added a bit of Merino wool to the mix, at a ratio of around 3/4 dog to 1/4 wool, to provide some elasticity and compensate for a short stable length. The finished hat is super soft and warm.

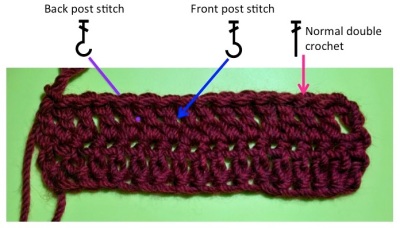
This hat is crocheted from a pattern by Aaron Mathew Asmussen, like the ‘man hat‘ I made previously. This time I used the Nested Diamond pattern, which was slightly more challenging then the Open Weave pattern I used before… challenging in a fun way :) I really enjoy working these pattern, and I feel like they’re giving me a good education in cables. There are certain elements, that are used to form cables, for example particular stitches that are use to form the bottom of this diamonds when one cable appears to cross over the other. I can see how, in the future, I might be able to put these elements together to create my own cable designs.

Crochet cable hat with dog fur yarn_20140515_235949

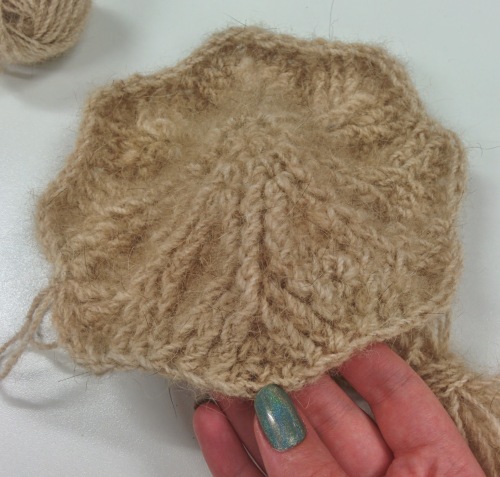
After finishing the increase rounds of the hat. You can see the ball of yarn I’ll be working next, and the skein to go after that. I think the hat looks a bit like a fuzzy starfish right now.

Crochet cable hat with dog fur yarn_20140516_000229

The diamond details starting to emerge.

Crochet cable hat with dog fur yarn_20140517_123250

Helpful Tim is helpful.

Crochet cable hat with dog fur yarn_20140516_163702

Kill Tim, kill!!!! Destroy the abomination of dog yarn!

Crochet cable hat with dog fur yarn_20140518_161055

Posing with the pretty hat, before I have to give it to the brother, who’ll probably take it into the bush to get to some rock climb or another. At least I know that he’s head will be warm!

For follow up photos, including the star of the show, the dogs, see here.

The making of a man hat

Today I’m showing you another accessory I’ve crocheted for the boyfriend. And just like the man scarf that came before, I’ve turned to post stitches to provide a pattern that isn’t too feminine while still being complex enough to keep me interested. Specifically this is the Open Weave C1 hat by Aaron Mathew Asmussen. I made this hat using two balls of Morris Pure in the colour Sooty, a lovely mid-grey. This is a worsted-weight (10-ply) wool yarn which is a single ply (as in composed on one strand of spun wool, not 1-ply weight in the British measurements). Being single ply I think it shows off the cables nicely, so that the design really pops.

Crochet cable hat #2

 I pose with the hat, I think it looks quite good on me :)

Aaron has a whole range of patterns for hats based on the most amazing cable designs; I foresee a lot of these hats emerging from my hook in the future. The cables not only add interest, they make these hats stretchy, and very thick and warm. All of Aaron’s patterns are made using half-double crochet stitch, which add to the snug factor.

Crochet cable hat #4

The man, in the man hat! Being poked by Choni.

Crochet cable hat #1

The pattern called for a 5 mm hook to create a medium beanie, I changed to a 6 mm hook so that my beanie would be large instead.

Crochet cable hat #3

This pattern is composed of series of vertical and horizontal cables. Vertical cables are made from front-post half-double crochet stitches. Horizontal cables are created by working back-post half-double crochet stitches in the row below, so that the cable we see is actually the top ‘v’s of the row above, which haven’t been worked into. Plain half-double crochets are also used to create the background ‘field’ where the cables are absent.

This certainly isn’t a pattern for beginners, though once I got the hang of it it went quite quickly and I found it really fun. The pattern is well written, though I do feel like this is the kind of pattern that would really benefit from charts. If you’re looking to get the hang of post stitches, I went into a bit of detail about them here, but what I’d really suggest is checking out Craftsy‘s new (free!) mini-class by Drew Emborsky ‘Amazing Crochet Textures: Ribbing, Cables and Beads’. It’s a really great resource (which I’ve reviewed here).

The making of a man scarf

When I decided to make a scarf for my boyfriend, I ran into a certain difficulty… finding a pattern that was ‘masculine’, but still challenging enough to keep me interested. I was in the mood at the time for something that was a bit more intricate. However, in crochet intricate is often associated with lace patterns, which wouldn’t suit my boyfriend at all.

IMG_20140419_000053

I found the solution in the great Elk Mountain Scarf pattern by Lisa Naskrent, which comes in a set of four Mountain Range Scarfs. These scarfs make use of ‘front post’ and ‘back post’ stitches to produce lovely cable patterns.

I’ve made a new improved post stitch tutorial, please check it out if you’re interested

Slide1

To create a post stitch you work into the body of the stitch in the row below, rather then the ‘v’s which run along the top of your work. If that doesn’t make sense, look at this handy figure I made (yep, I’m a scientist). Here you can see a row of double crochet stitches, the first two arrows point to the posts of the stitches, and to the points where you would insert your hook to make both the back post and front post stitch in the next row. For example, in the back post stitch you would go from the back of the work, around the post, and out the back again, drawing up a loop that wraps around the post. The last arrow points to a ‘v’ into which you will would work while making a normal double crochet.

My boyfriend scarf is made from three balls of Italian Grignasco Loden, in (I believe) colour 592. This is a 10 ply / worsted weight tweed yarn, a blend of wool, alpaca, and viscose. The scarf worked up quickly using a 5.5 mm hook. At the end of one (very long) night, I had one rather long scarf.

IMG_20140419_000010

The border is made using the crab or revers single crochet stitch, which is a difficult stitch to describe… I would recombined just trying to do it instead, take your hook and create the single crochet stitch in the opposite direction to that in which you normally work (if you’re right handed, left to right rather then right to left). It makes a nice boarder which isn’t too lacy. 

IMG_20140419_000027

Now I’ll have to work on getting a photo of the boyfriend modelling his scarf! Wish me luck, I’ll need it.