You might think that I’d get over hats, but if that’s the case, it hasn’t happened yet. I have two hats today, one made for my friend James, Flick’s partner, and one for my boyfriends father.
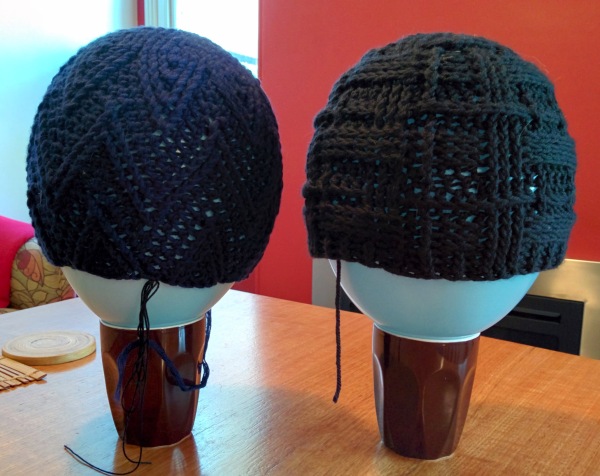
Here they are unblocked. They both made from patterns by Aaron Matthew Asmussen. The black beanie, for my boyfriends father is from the Open Weave pattern. And the blue beanie for James from the Zig (aka Charlie Brown) pattern.
The first hat I made from Aaron’s patterns used the Open Weave pattern, this one was for my boyfriend, it’s interesting going back to the pattern now that I have much more experience with these cable hats. The Open Weave remains the most complicated of Aaron’s patterns that I’ve tried. I think it’s because his other pattern use only front-post and normal stitches, where as Open weave also uses back-post stitches as well. And the number of pattern repeats changes between rounds, which adds another level of complication. As with any pattern like this, it’s a matter of following the pattern carefully and having patience, particularly with the changing repeats, because it’s easy to make incorrect assumptions about rounds.
Here are the two hats, blocking over balloons, which have been blown to the circumference of a larger man’s head. You might remember that when I blocked Flick’s hat this way, I ended up having to rip back the last round, because the brim was still curling up. This is because front-post stitches tend to curl outward, and the balloon curves inwards, so while the rest of the hat is blocked nicely the brim needs a bit more attention.
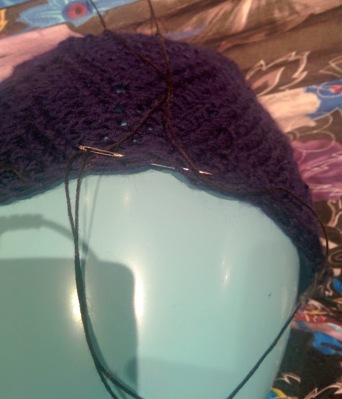
To address this problem, I took some yarn (actually crochet cotton) and threaded it through the last round, so that I could pull it in to the base of the balloon. I made sure that the round was sitting flat, without any curl. Since the balloon is narrower at the bottom, I obviously wasn’t introducing any stretch in the brim, but I wasn’t worried about that, I just wanted to straighten it out, in fact a snug brim is nice, it will stretch to the prefect size with wear.
(I didn’t have to worry about this with the black hat, because I ended it with a few rounds of alternating front-post and back-post stitches. Front-post stitches curl out, back-post stitches curl in, so the brim ended up straight :) )
Here’s the blue hat, ready to go to it’s new home. But the way, I used Morris empire, worsted weight (10-ply) for this hat, and a 5.5 mm hook, half a size bigger than the pattern suggests to make the hat a bit bigger.
And the black hat, this one from Grignasco Loden, again with the 5.5 mm hook
But shhh, don’t tell, they’re both surprises :)


There is no reason to get over hats when you execute them so nicely! This is awesome! I tend to stay away from making hats because the gauge is important I’m impatient figuring that out. These are awesome designs! I like the colors you are using too! Very nice :D
LikeLike
Thank you so much for your lovely comment. These hats would be great for you if gauge is a concern, because the cables give them so much stretch. You also don’t have to do a gauge swatch, rather the pattern gives measurements for each increasing round and you can check that you’re on track as you go
LikeLike
These hats look great! I was actually inspired by this post to try the Open Weave pattern myself despite being a newbie to crochet. Now I’m super stuck on the INC-B increase – were you able to figure these out? I can’t get my head around how to get a stitch “behind” another.
LikeLike
It’s a wonderful pattern! Though it was a bit tricky for me to get my head around at first.
Let’s see… first think about a normal increase first. For the first stitch you make a stitch around the post of the row below. For the second stitch of the increase you go around the same post of the row below, in front of the stitch you made first. So that the second stitch lays on top of the first. We don’t normally think of it this way, because it’s just how we do it by default, but if you have a look you should be able to see that the second stitch of the increase is covering the first.
To do the ‘behind’ stitch you start exactly same, making a stitch around the post of the row below. But then you insert your hook ‘behind’ the first stitch, and around the post. So that when you make the second stitch, it will be beneath the first stitch, rather than on top of it. When I do this I’m kind of tucking my hook behind the first stitch, before sending it under the post. It can seem a bit awkward at first, but you get the hang of it.
I hope that helps, it’s a bit difficult to explain. Please let me know if you’re still having problems.
LikeLike
Thanks so much! OK, I think I got it by sort of folding the first stitch forward and sliding it down the post, and doing my FPHDC in that new spot. It certainly looks different front my INC, so hopefully I’m on the right track.
LikeLike
That sounds like it should work perfectly. You want the second stitch in the place the first stitch went originally.
LikeLike